

Blockonix is one of a kind decentralized exchange which runs on the ethereum blockchain. Every function of the exchange is entirely blockchain based. Starting from trading to listing a new token, every function occurs on the ethereum network. Not only this, the exchange is totally community drive. All the trading fee as well as the listing fee earned is either directly burnt forever or places a market order in the BDT/ETH (Blockonix Token to Ethereum) market to buy back tokens from the community members. The clear decentralized nature of the exchange makes it one of the safest cryptocurrency exchange in the world. Using a decentralized exchange may prove to be troublesome for some people especially the newcomers in the crypto space. Here is a step by step guide of how to use the Blockonix Decentralized Exchange:
Reading the pop-up:
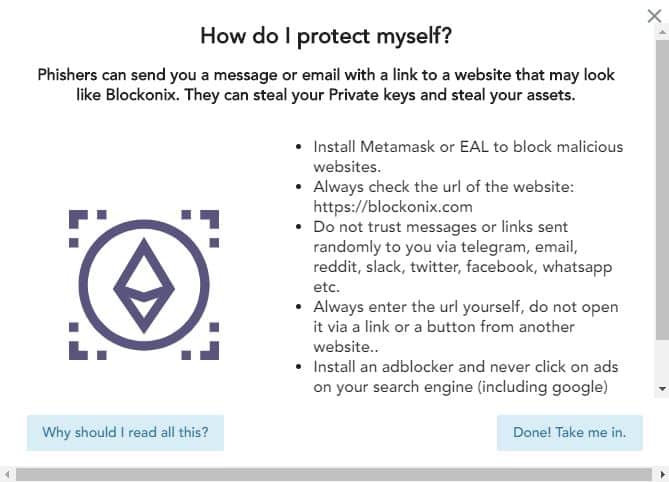
As you first visit the exchange website, a pop-up appears which explains the important measures to be taken care of in order to maintain the security of your tokens as well as a little about the working of the exchange. It is recommended to read each point clearly before starting to trade on the platform. Once you have read all the points thoroughly, click on ‘Done! Take me in.’ button on the last pop-up screen.
Start Trading:
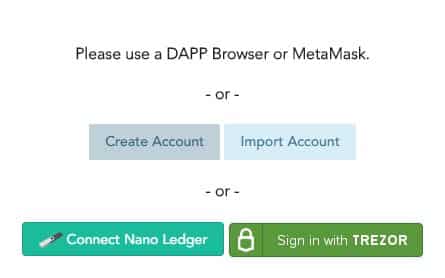
Once you have entered the Blockonix platform, you get a pop-up to link your wallet to the exchange in order to start trading. Due to the decentralized nature of the exchange, you have to trade with your own wallet rather than the wallet that most exchanges provide. This is quite fascinating for those who believe in Proof of Keys as the Blockonix exchange does not hold any user’s funds or tokens. To connect your wallet click on any of the suitable options listed on the pop-up screen:
- You can create a new wallet: Only you will be the holder of this wallet. (Same as the case when you create a new ethereum wallet on MyEtherWallet).
or
- Import your existing wallet by using your private key or JSON file.
or
- Connect your hardware wallet (TREZOR OR LEDGER).
or
- Connect using Metamask: Just unlock your metamask and refresh the page (It will be connected automatically).
Once you have connected your wallet, click on the Accounts tab on the header of the panel. Inside the Accounts Tab, you are able to see the tokens you currently hold in your wallet.
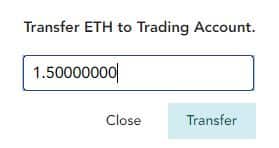
To start trading the tokens you need to transfer the particular token (you wish to trade) from the Main Account to the Trading Account. For this click on the right-pointing arrow (blue colored) besides the particular token, you wish to transfer. (Note: The following tokens are transferred to the exchange contract address which is public, so you are still the only owner of your tokens). Once you click on the right-pointing arrow, a pop-up will appear asking you for the number of tokens you wish to transfer to the Trading Account in order to start trading. Enter the number of tokens and click on transfer.
- If you have created a new wallet or imported your wallet using the private key or JSON file, the transfer shall be automated once you click on the transfer button.
- If you are using Metamask, Trezor or Ledger: You need to manually approve the transaction (transfer) when prompted by the particular type of wallet. In the case of Metamask, you may be asked for approval two times rather than once.
Once you have made the transfer and the transaction gets approved on the ethereum network, you will be able to see your tokens in the Trading Account (Refresh the page once if you are not able to see the tokens even after the transaction is approved).
Once you see the tokens in your Trading Account, you can now start trading!
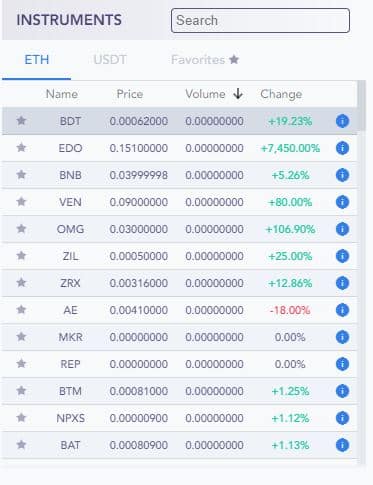
- Click on the Exchange Tab on the header of the panel and choose the type of instrument you would like to trade.
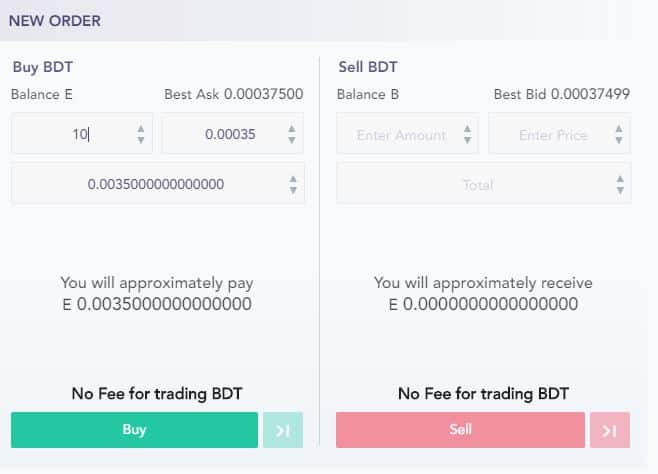
- Place an order by adding the details in the New Order section on the screen.
- After filling the details click on Buy or Sell whatever you would like to do.
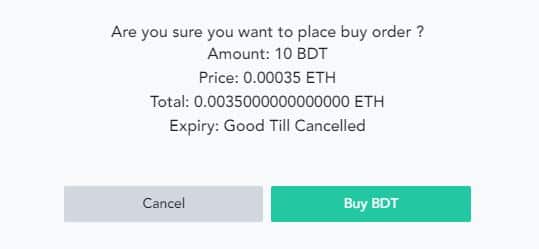
- A pop up will appear giving you a summary of the order you are going to place. Click on Buy or Sell if you are sure to place the order. Once you confirm, your order will be placed in the market once the transaction is approved on the ethereum network.
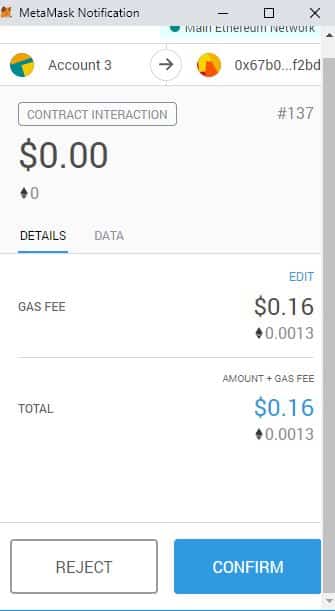
If you are using Metamask, Ledger or Trezor: You will be asked to confirm the transaction manually by the particular wallet software. Confirm the transaction in order to place the market order.
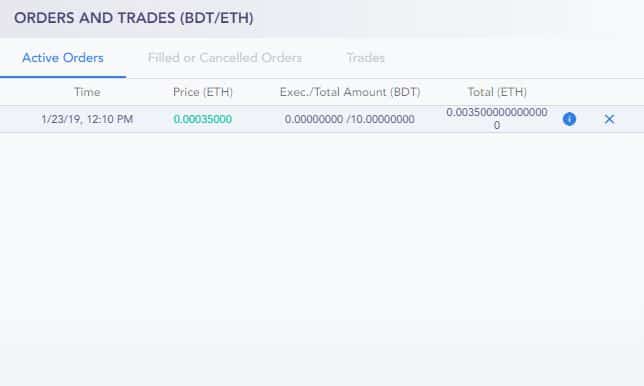
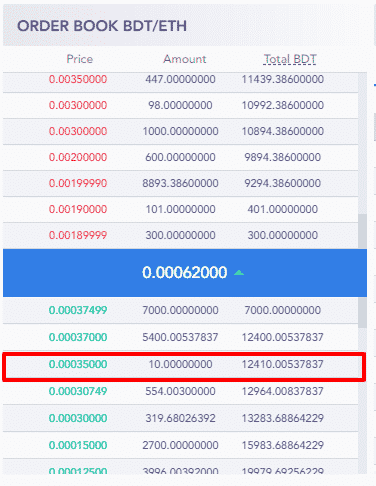
- Once the transaction is confirmed on the ethereum network, you order will be visible in the Order Book as well as in the Orders And Trades section. (Refresh the page if you are not able to see your transaction even after the ethereum transaction is approved).
BDT Token Burn:
All the fee earned by the Blockonix exchange is burnt forever. To check the number of burnt tokens:
Go to Etherscan and search the blockonix contract address:
0x741f58cd68d24f361cc0ee0d3aaf7df2bf16132e
https://etherscan.io/token/0x741f58cd68d24f361cc0ee0d3aaf7df2bf16132e
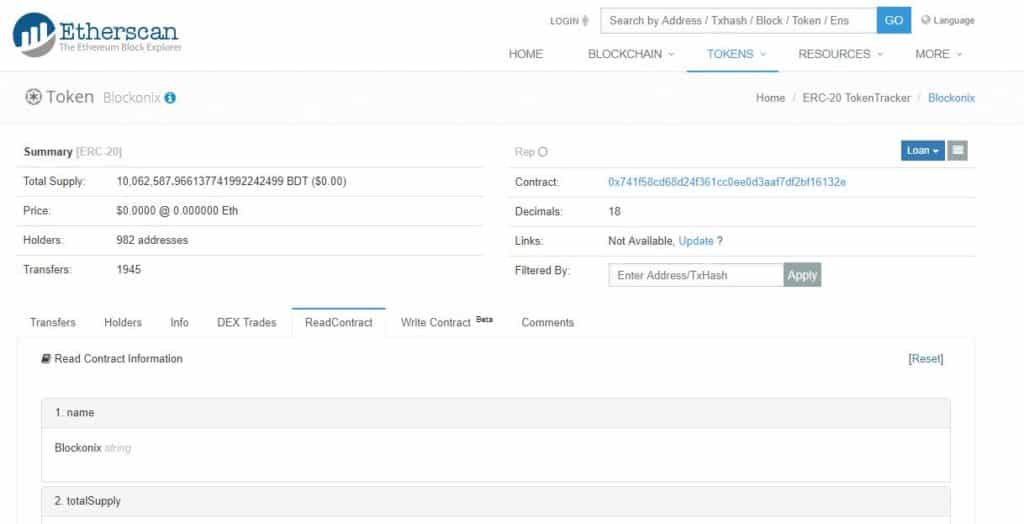
Click on ReadContract and Scroll Down to the 11th point (burntTokens) where the number of burnt tokens up to the day is mentioned (Please note: the value displayed here is a multiple of 10^18).
Once the tokens are burnt, the total supply of BDT token is automatically reduced.
The Blockonix Contract Source Code is also made public by the exchange:
https://etherscan.io/address/0x741f58cd68d24f361cc0ee0d3aaf7df2bf16132e#code


